Firstly, Where am I?
Currently I am undertaking a year long lithography course at Leicester Print Workshop lead by Serena Smith and Nora Hammenburg. I joined this course to give myself the time to develop my practice. While I’m not new to lithography, I feel that I had grown comfortable only drawing with crayon and I need to expand my skillset. Having a year to do this eases any pressures from time or fear of making a mistake – if it goes wrong, I can grain the stone and start fresh tomorrow. More than anything I want to experiment with as many different techniques in lithography as I can. So far, I have been introduced to photolithography, gum transfer paper and Lo Shu washes. With guidance from two lithography tutors I am being flooded with knowledge while also having time to explore independently.
Lo Shu Experiments
#1
I began my Lo Shu experimentation in April and in has taken me four test stones used across two months to get a clear print with strong contrasts.
A Lo Shu wash is a reversal technique where a mixture of gum arabic and water is applied to the stone to create a unique pattern. There are many variables when it comes to Lo Shu, and lithography in general, which is why I have gotten into the practice of making test stones and variable tables. For my first stone I looked at the effect that the type of water and the ratio of gum to water. Each row represents the drops increasing, 1-4. Each column is a different type of water, bottled, tap, and warm tap water. Using a pipette, 1-4 drops would be added to 30ml of water and then poured onto the stone in a “puddle.” As instructed by the Tamarind Institute's 2008 book, I did not mix the solution. To stop the puddle from spreading I used a pastel pencil to create a boarder. I also gummed some of the background and let the other section fill in black.
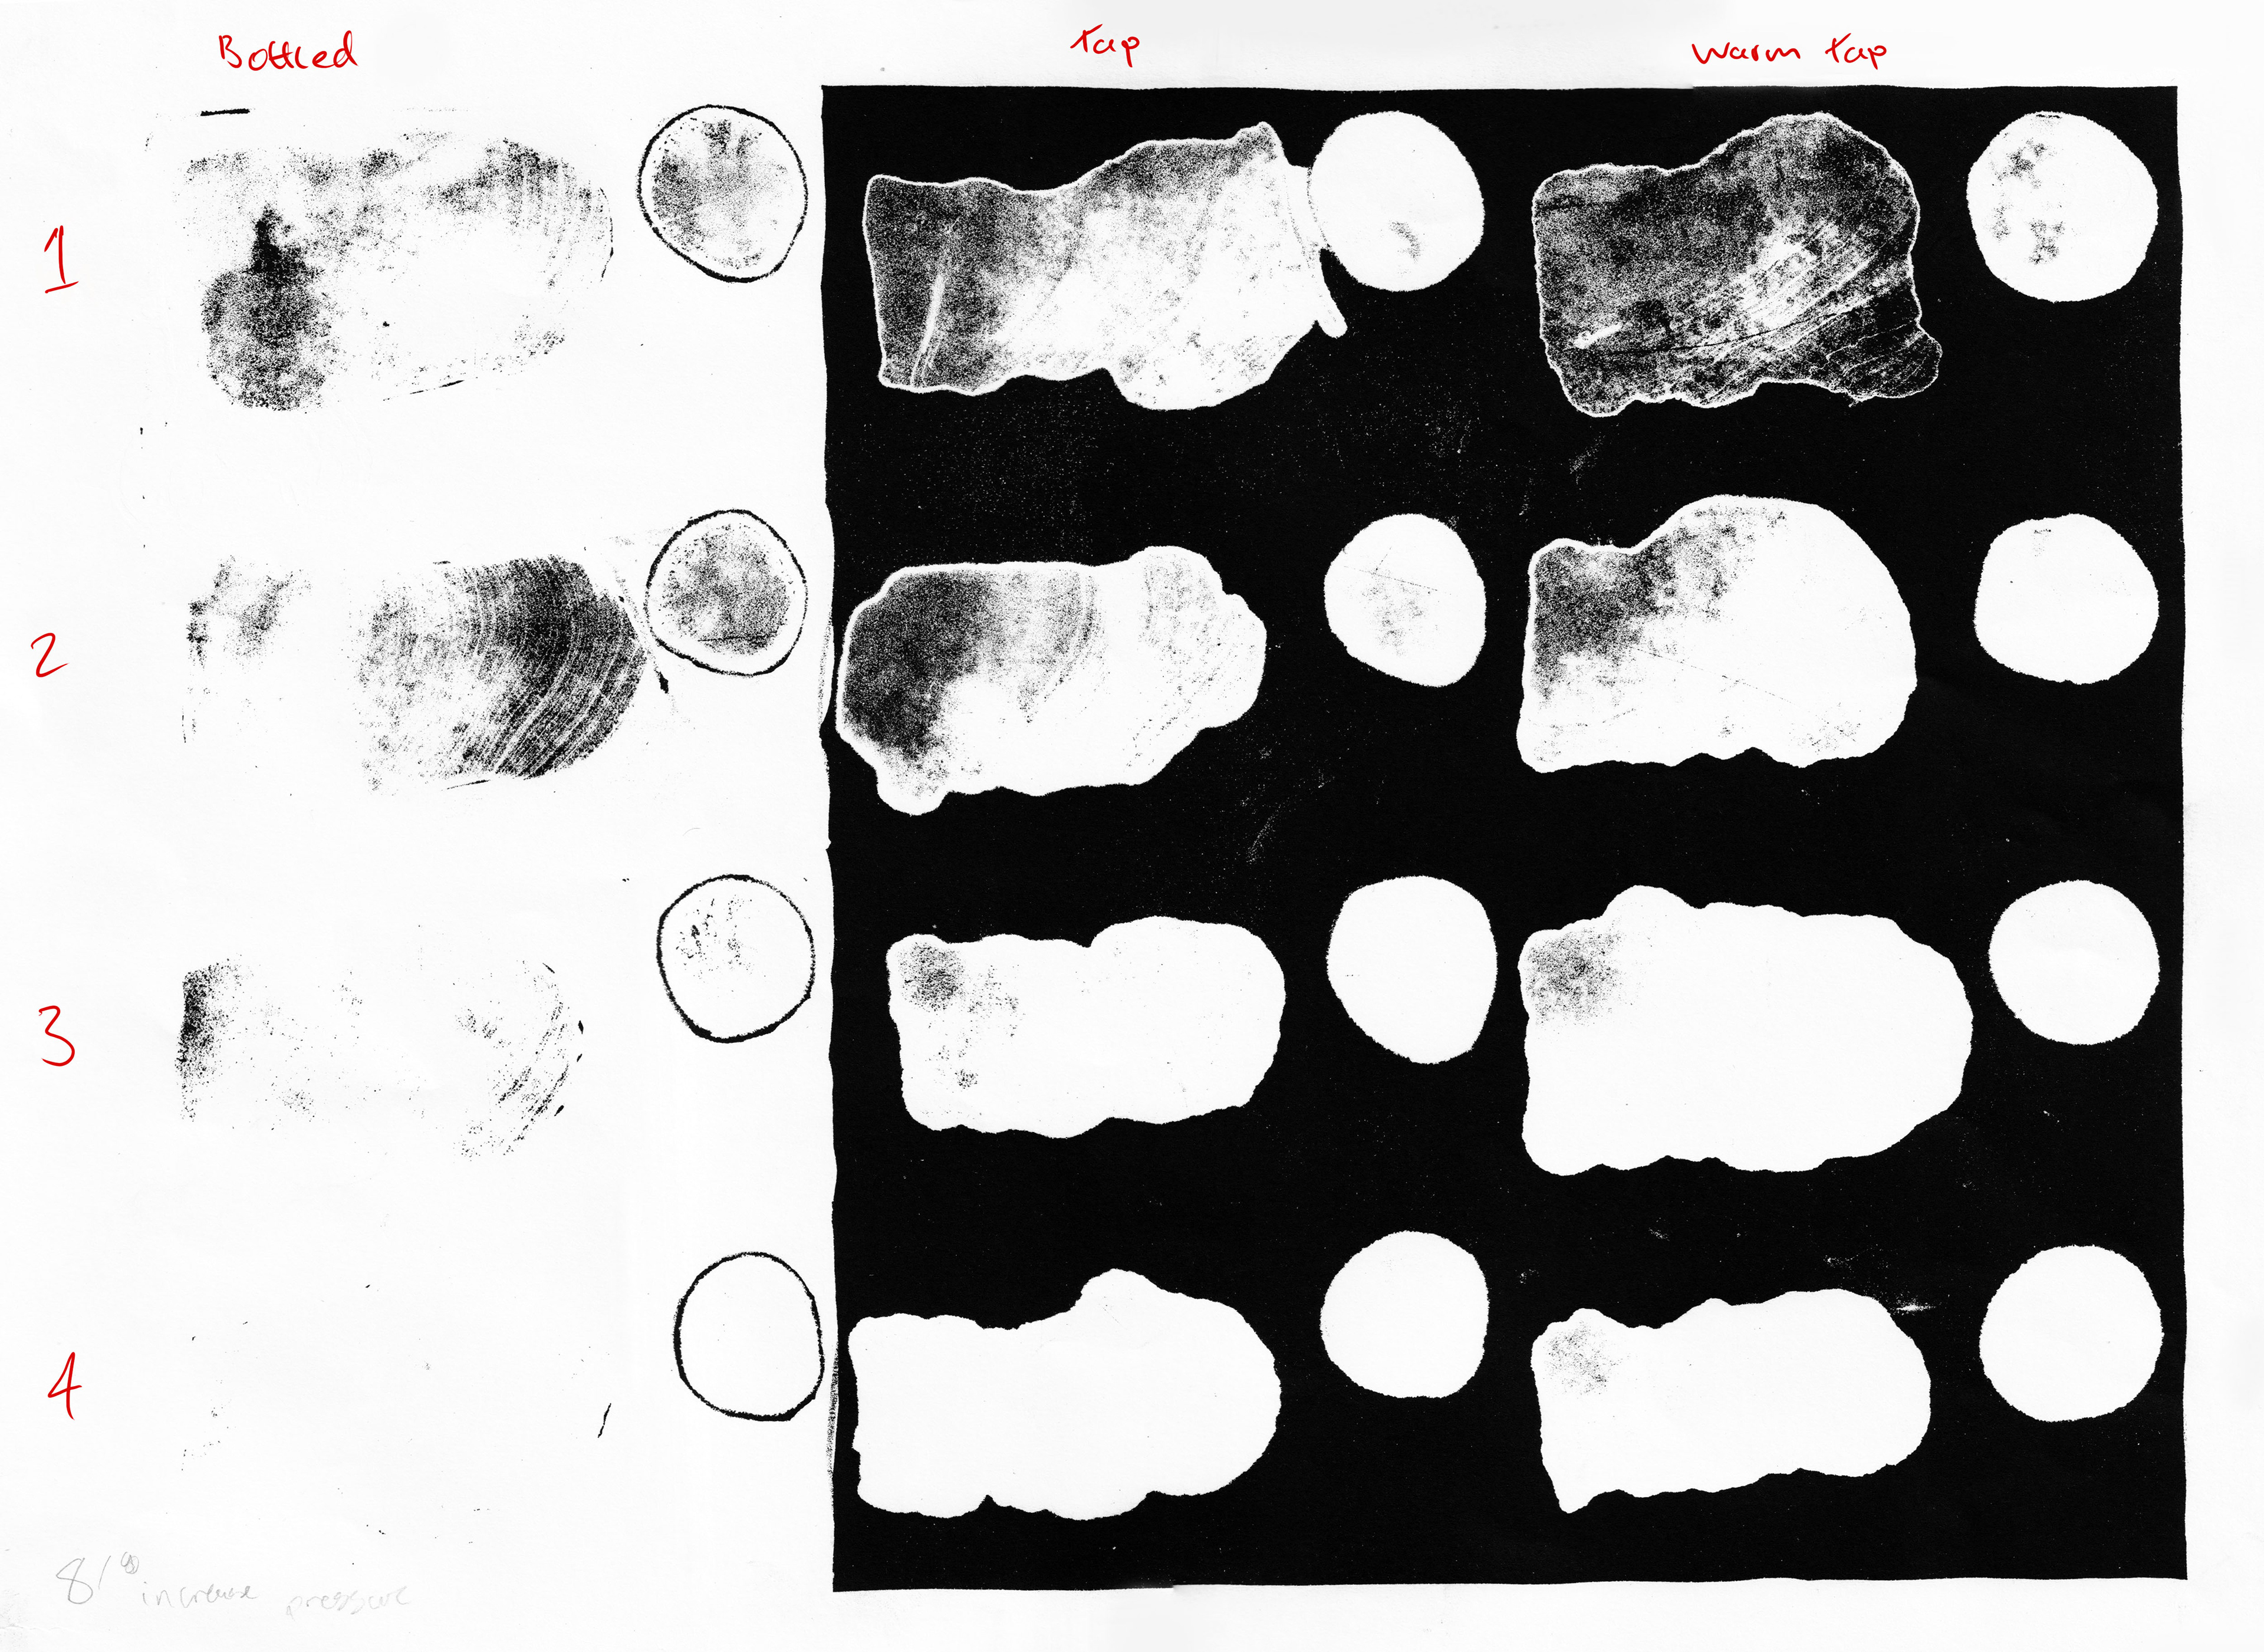
While this looked good on the stone, most of the washes didn’t print very well as I had trouble getting the blacks in the washes to take enough ink. In fact, this would be a problem that I would continue to have. What I did learn from this stone was that warm tap water gave the best reticulations and the gum is more affective than you expect.
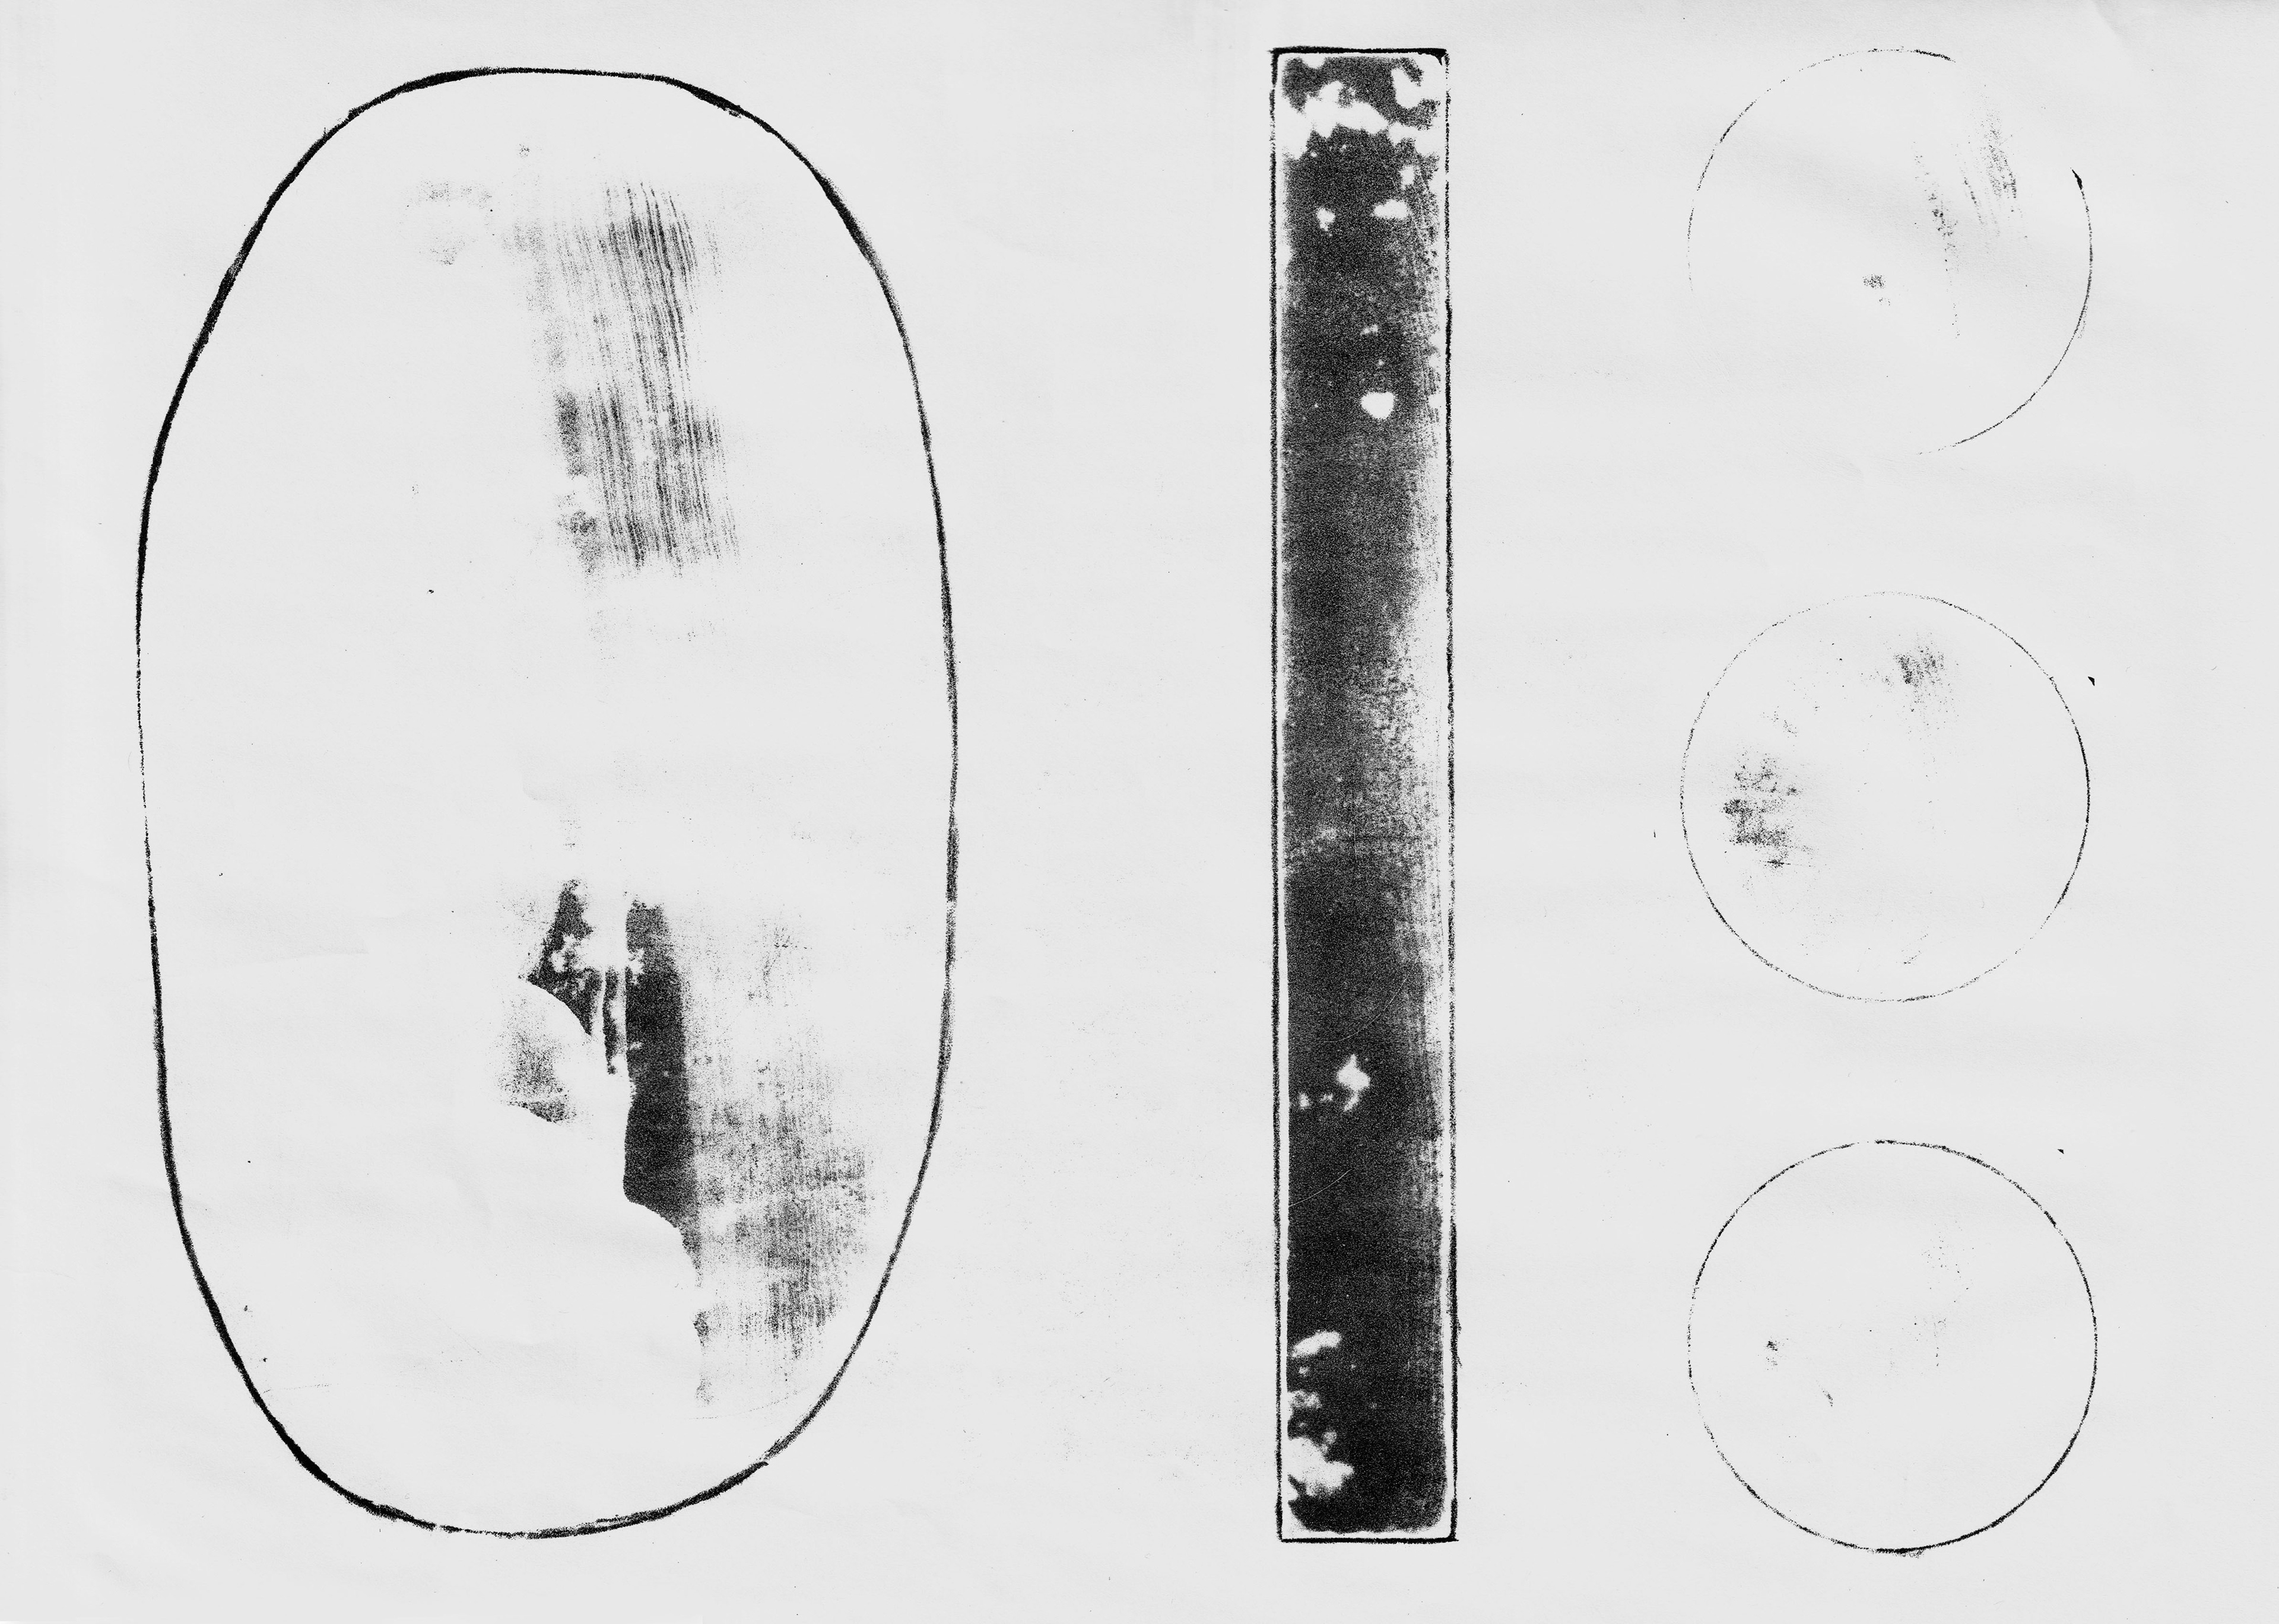
#2
For my second try I used a ratio of 1:30 with warm tap water. I wanted to see how the patterns would look with different shapes. I had used a syringe to have more control over the pour and applied the solution in puddles as before leaving them to dry overnight. The next day one of the shapes was only half dry. So, I used a hairdryer to dry the remaining water – this was my first mistake. This heated the gum causing it to spread further than if it dried naturally. My second mistake was when I removed the asphaltum and gum coat. I used too much water which burned the already delicate image. Therefore, both mistakes combined made for another very light image.
#3
The third stone didn’t even make it to the printing stage. After the wash had dried and I rolled it up ready for the first etch, the ghost image from the previous wash had come through. This is the fifth lesson I learned. Sometimes grit isn’t enough on its own. As I have been using the same stone for each Lo Shu attempt the washes have sunk further into the stone. Now between each use I thoroughly clean the stone with citric or acetic acid as well as graining with grit. This does take about two full days, but I knew what I was signing up for with washes. So, after three consecutive fails, naturally, I took a break.
#4
Taking all of what I learned from my previous attempts eventually I tried again and with Nora’s help I was able to finally get a good print.
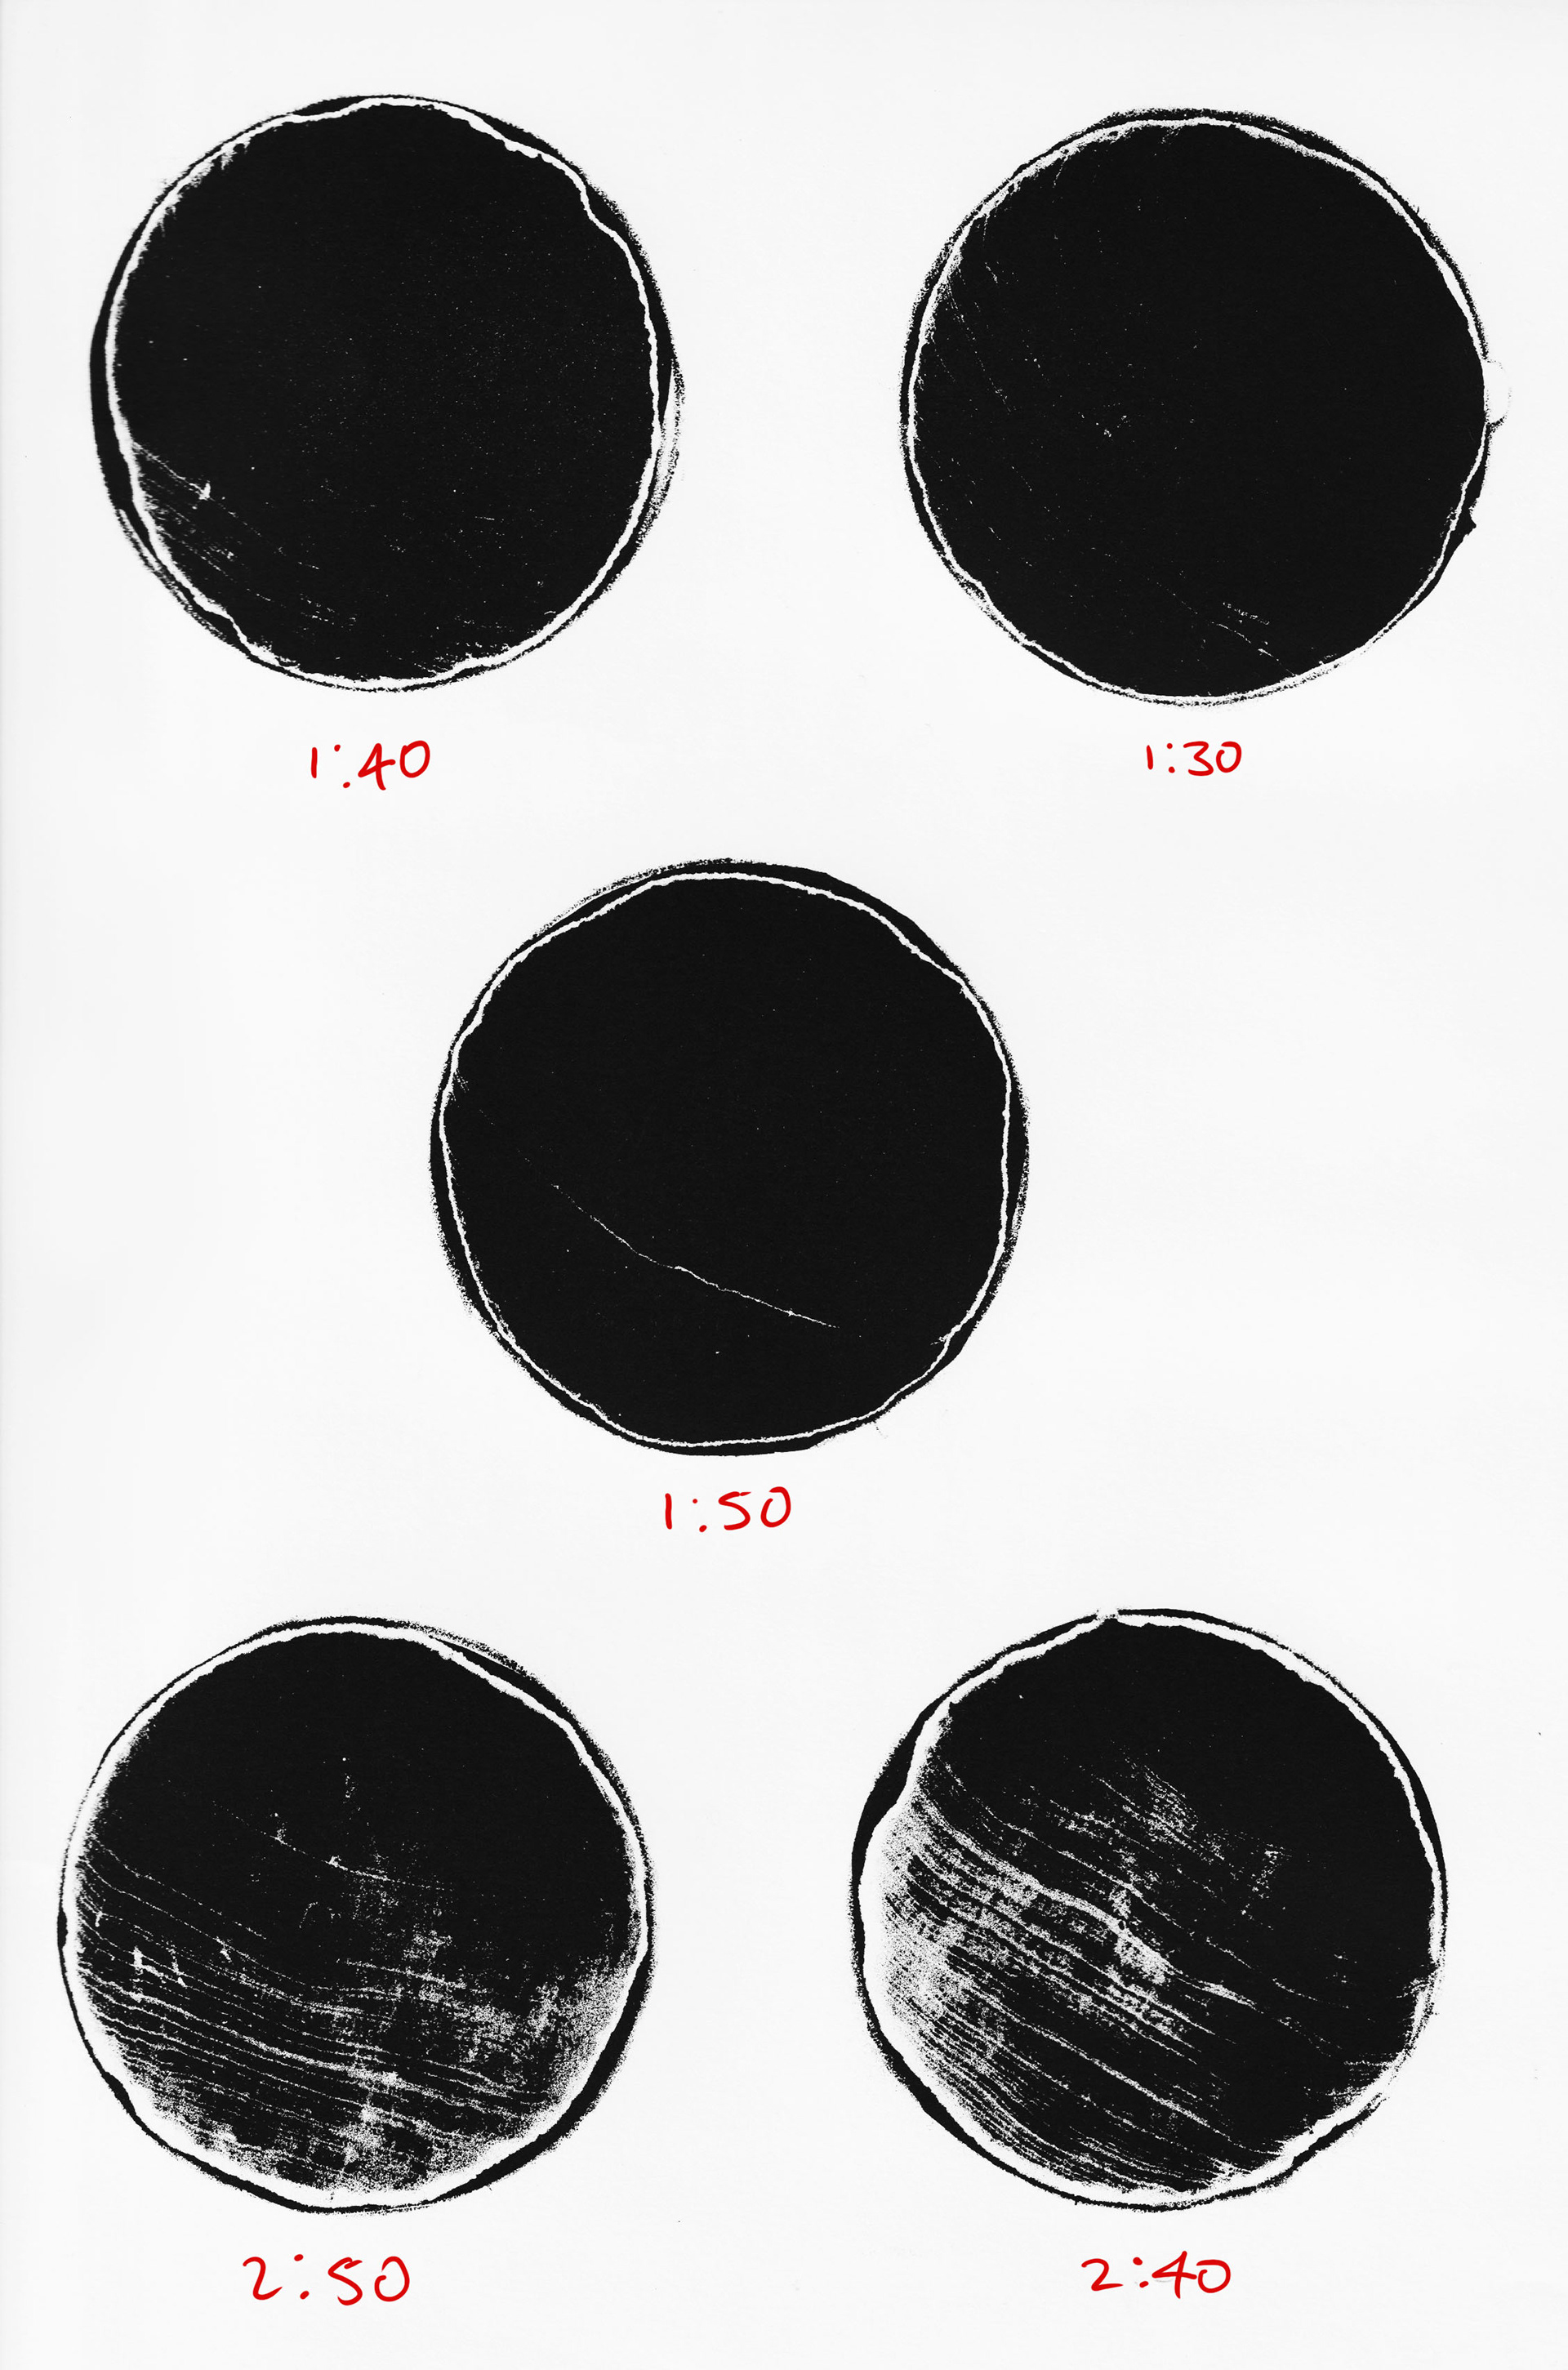
For this experiment I was trying to see the difference between mixing the solution and not mixing it. Some of the literature says to mix the gum and water other texts say to just drop the gum in and leave it and up until this point I did not mix the solution. So, for this stone I had one side which was mixed and one side un-mixed. Each circle had a different ratio and dilution of gum to water to test what is the optimal combination. When I came to process the stone, I noticed that all the gum on the unmixed side had migrated to the edge of the circle which the gum in the mixed circles and spread throughout. This meant the unmixed circles all filled in black with a thin white ring around them. The mixed circles presented a range of patterns with the 2:40 and 2:50 mixtures having the best veins.
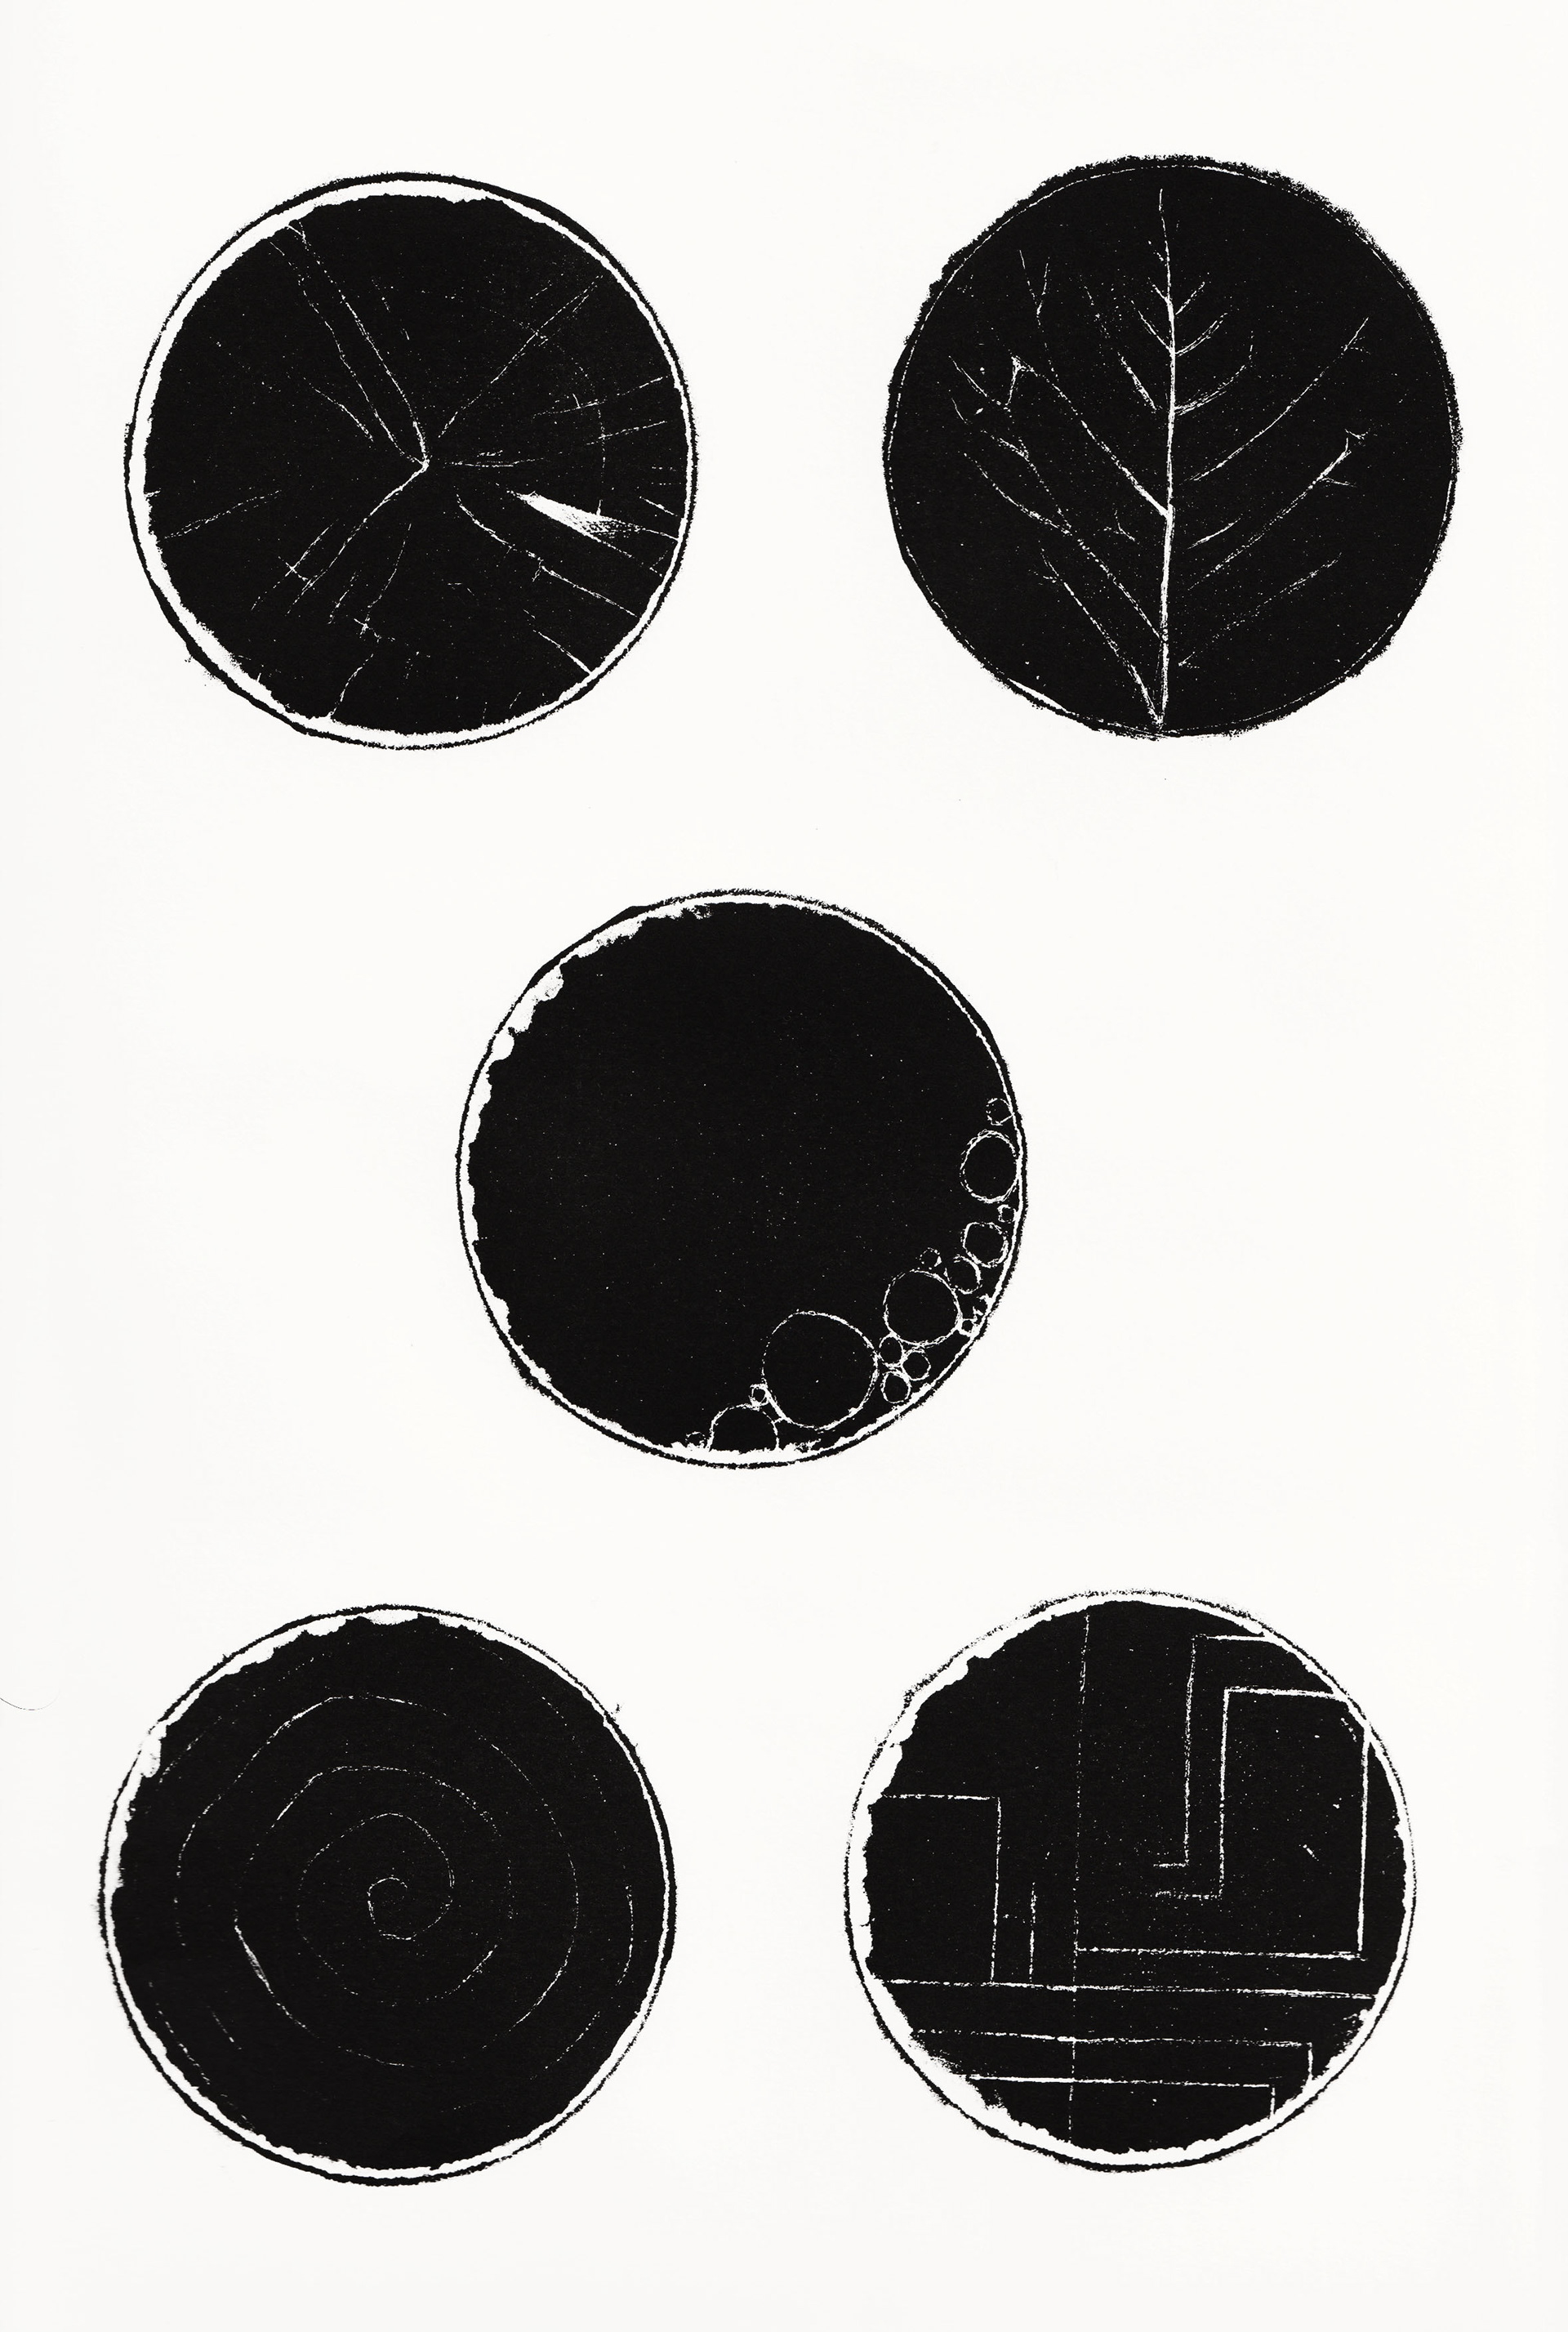
As I said, the un-mixed circles were all black which I thought would be a shame to let go to waste, so I did a little manière noir test on them. Using a scalpel, I scratched shapes into each circle then etched them with a 20-drop acid-gum mixture. Here I was very careful not to have this gum creep to the other side of the stone as I only etch the Lo Shu washes with plain gum since they are so delicate. After being left to rest over night, I applied a second etch of the same strength. Each time the images were spot etched with a small paintbrush to avoid potentially burning the background.
When I came to print this stone, it rolled up nicely with the dark areas becoming a solid black and any areas with gum white. However, the manière noir side did fill in after a few prints. This I did expect as I did not initially prep the stone for this technique, and I think the matrix could have taken a stronger etch. But it was nice to see the two techniques side by side and while difficult it was fun to juggle the two at the same time.
Lo Shu step by step:
1) Prepare a fine-grained level stone to apply washes.
2) Mix washes. 2 drops of gum added to 40ml of warm tap water gave me the best patterns. 2:50 works well also. Feel free to experiment.
3) Apply washes in puddles, allow puddles to dry naturally. This may take a whole day.
4) When dry gum the boarders and gum anywhere you don’t want to be inked around the washes. Dry gum.
5) Buff in a thin layer of asphaltum with a clean rag. Wait 15 minutes.
6) Apply a thin layer of sansador (or turpentine/lithotine) to dissolve the asphaltum.
7) With sansador still on the stone buff in 1:1 mixture of asphaltum and Charbonnel Noir a Monter litho ink (or any soft roll up ink). Wait 5 minutes.
8) Roll out roll up ink on slab.
9) Wash off matrix with damp rag and sponge. Use as little water as possible. Be gentle, do not rub harshly.
10) Ink up stone. Stop as soon as details appear.
11) Dry stone and talc.
12) Etch stone with gum only.
13) Leave overnight.
14) Wash out with sansador
15) Buff in asphaltum.
16) Wash off asphaltum and gum with rag and wet sponge. Again, use as little water as possible.
17) Keep stone damp, ink up and print as usual adjusting the ink and pressure when necessary.
*Similar to the technique outlined in the Tamarind book with some materials substitutes.
Explaining Some of The Science
To make lithography prints you don’t have to know the science of it all. If you understand the order in which you apply materials on to the stone and how to take a print, you can make a lithograph. However, as I learn more about lithography understanding why I am doing what I am doing has made me into a more conscious printmaker. This also helps me to predict what will happen in my experiments and why something didn’t work rather than aimlessly repeating a failed test. Admittedly, I don’t have the most in depth knowledge of the science behind lithography, but these are some of the things I have recorded throughout my Lo Shu exploration.
Gum arabic is water soluble so when there is more water than gum in a solution the gum is suspended. When the solution is mixed this allows for the gum to be more evenly dispersed throughout the solution than when it isn’t. In my mixture I used warm water to increase the rate of dissolution. A syringe and a clean paintbrush make it much easier to create the puddles on the stone especially if you are trying to fill specific shapes. To create clean shapes and boarders use a chalk pastel or a charcoal stick as they create a barrier against the water.
One of the most important things to note is that everything must be clean before you begin. This wash uses very little gum, and one drop can be the difference between a wash that prints and one that doesn’t. To illustrate, one drop of gum from a pipette is about 0.05ml. If that drop is mixed with 30ml of water that means that solution is only 0.16% gum. The solution with the most gum was 2:40 which is 0.25% gum. Therefore, I would suggest washing any bowls, brushes and measuring cups before use to remove any gum that may have dried previously.
This being my first blog entry for this course, expect more write ups of my experiments and development of my practice. Also expect entries may be edited as I continue to find the best way to catalogue my experience. More than anything I would like this to open a dialogue between printmakers and open myself up to share the knowledge of the technique that I have had the privilege of learning the past few years.
A glossary of some of the words mentioned in this post can be found here.
For more casual frequent updates you can find my Instagram @samantha_m.t
Any printmakers, artists or enthusiasts that wish to get in contact with me my email is smt.thompson@outlook.com
Thanks for reading,
Samantha
Published 11/07/2025
Updated 14/07/25